July_ColorScheme

The Right Way to Pick a (Gorgeous!) Color Scheme for Your Home

[et_pb_section fb_built=”1″ _builder_version=”4.9.4″ _module_preset=”default”][et_pb_row _builder_version=”4.9.4″ _module_preset=”default”][et_pb_column type=”4_4″ _builder_version=”4.9.4″ _module_preset=”default”][et_pb_divider _builder_version=”4.9.4″ _module_preset=”default” color=”#8F8F8F” divider_weight=”4px” hover_enabled=”0″ sticky_enabled=”0″][/et_pb_divider][et_pb_text _builder_version=”4.9.4″ _module_preset=”default”]

Because the wrong paint job can seriously wreck your home.

Picking a color for one room can be challenging enough. But picking a palette for your whole house?

That feels daunting. Coordinate your colors too much, you’ll end up matchy matchy. Don’t coordinate your colors enough, you’ll end up tacky tacky.

And that not only messes with your mojo, it can be bad for home value. Because ugly colors turn off buyers, and you may not get the best price if you ever sell.

But you can end up with colors you’ll love that’ll also enhance your home’s value — by following these tips from two designers who recently re-colored two different houses.

[/et_pb_text][et_pb_text _builder_version=”4.9.4″ _module_preset=”default”]

First, Find Your Inspiration

[/et_pb_text][et_pb_text _builder_version=”4.9.4″ _module_preset=”default”]

Rather than picking a palette from a big box store’s paint brochures or from whatever Pinterest’s algorithm serves you up, look into your own soul. Or, at least, into your closet or out your window.

“Designers always have a starting point,” says interior designer Maria Killam, who also writes the “Colour Me Happy” blog.

It might be a favorite sweater or a photo of your favorite beach spot. Or a pillow, Killam says.

Or it could be a feeling you want your home to have: cheery, bright, dramatic, cozy … whatever feels right to you.

For Killam, it was a feeling of “fresh.” So she used a mix of flowers and foliage to come up with her inspiration:

For HomePolish designer Melissa Mascara, wallpaper patterns inspired her palette.

[/et_pb_text][et_pb_text _builder_version=”4.9.4″ _module_preset=”default” locked=”off”]

Learn (Just a Bit) About Undertones

[/et_pb_text][et_pb_text _builder_version=”4.9.4″ _module_preset=”default”]

Paint color undertones have the power to make or break your whole-house color palette — and you’re not alone if your response to that is, “Under-whats, now?”

If you’ve ever had a beige that looks just right in the can, but turns an ugly shade of pink on the wall, it’s a red undertone to blame. And it happens because undertones are almost impossible to see in the can.

But you need to find them because the undertones in your home’s cabinets and counters can bring out the undertones you can’t see in your palette — like that ugly pink beige mentioned above. White cabinets with a green undertone could be the culprit that changed it to something sickly.

[/et_pb_text][et_pb_text _builder_version=”4.9.4″ _module_preset=”default” locked=”off”]

Start With a Neutral And Two Other Colors

[/et_pb_text][et_pb_text _builder_version=”4.9.4″ _module_preset=”default”]

When choosing a palette, start with three colors. Three is a balanced number, and it gives just enough visual interest without overwhelming you.

Choose a neutral shade and add two more tones, all of which should come directly from your inspiration piece. As you put your palette together, keep in mind your neutral color should be in every room. That’s what helps pull the whole-house palette together.

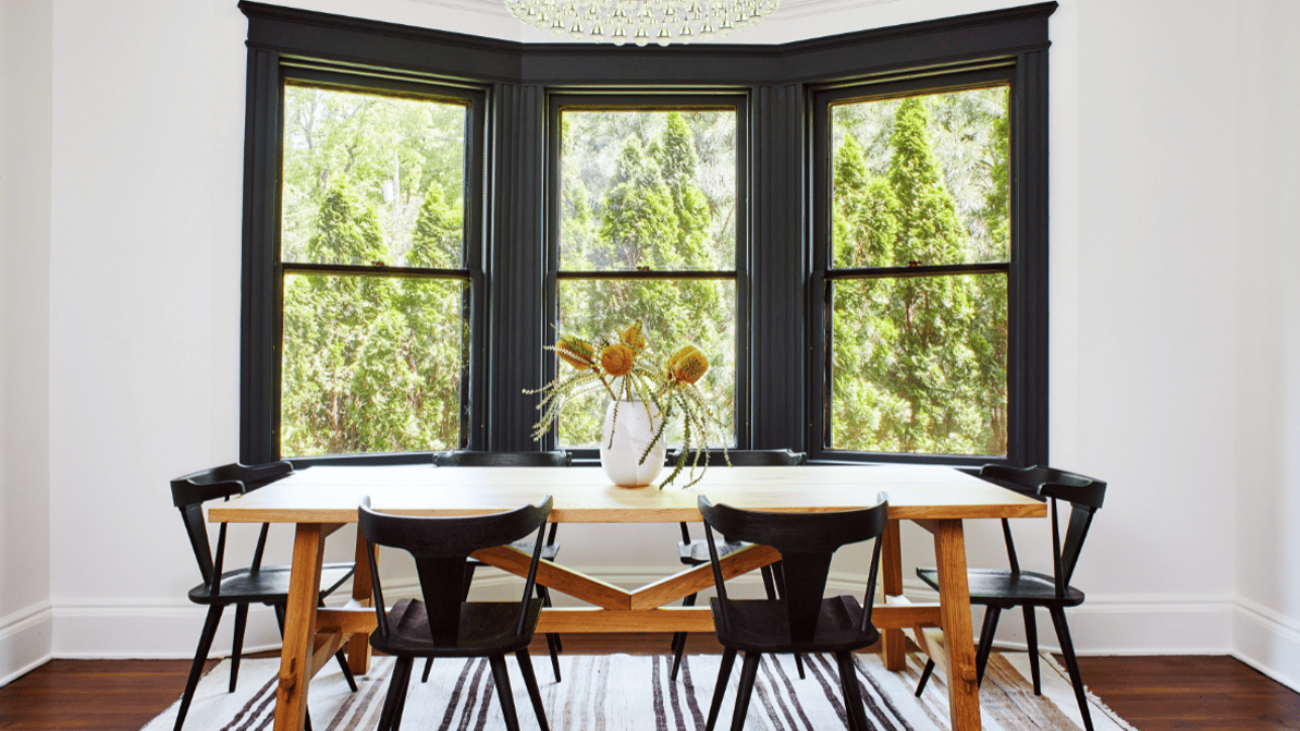
Killam chose white (Sherwin-Williams Shoji White) as her neutral:

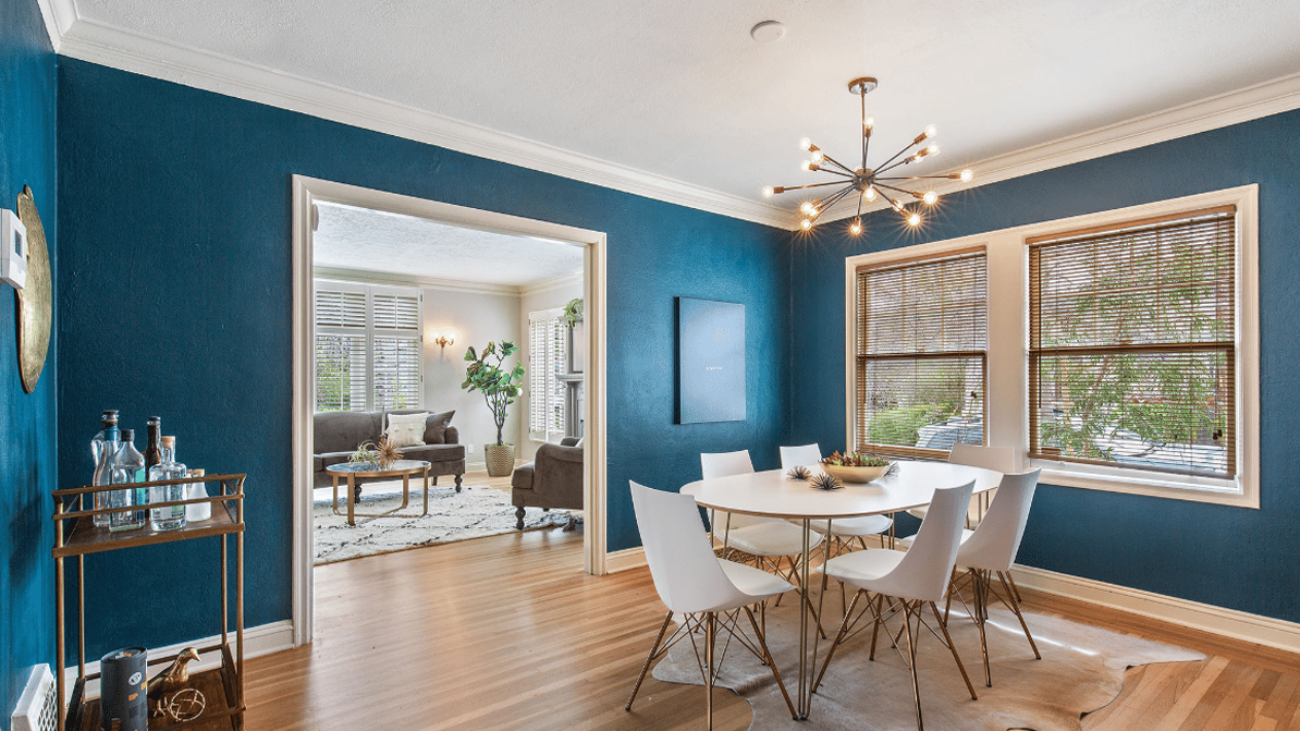
And Mascara chose shades of brown, which are reflected in the wood floors, doors, and trim on the built-in shelves:

“The trend isn’t the one accent wall, like it was in the ’80s, or painting each room a different color like we did in the ’90s,” says Killam. “Now we’re choosing a main neutral to go throughout the house.”

[/et_pb_text][et_pb_text _builder_version=”4.9.4″ _module_preset=”default” locked=”off”]

Add More Colors

[/et_pb_text][et_pb_text _builder_version=”4.9.4″ _module_preset=”default”]

Of course, you don’t have to limit yourself to three colors.

Mascara ended up picking seven colors:

While Killam went with six hues, including a customized color (yep, you can do that — most any paint store will help you):

[/et_pb_text][et_pb_text _builder_version=”4.9.4″ _module_preset=”default” locked=”off”]

Repeat Colors From Room to Room

[/et_pb_text][et_pb_text _builder_version=”4.9.4″ _module_preset=”default”]

Designers create the coordinated look of a whole-house palette through repetition.

“Use any color at least twice,” says Mascara. “For example, the dominant wall color in one space might become an accent color in the next.” Mascara followed this rule by using turquoise paint in the home office and turquoise patterned wallpaper in the dining room.

Note that having a six- or seven-color palette does not give you license to cram all the colors into every room in equal measure — or that each of seven rooms should be swallowed whole by a single shade. Yikes. Distribute your palette throughout the house in a balanced way.

[/et_pb_text][et_pb_text _builder_version=”4.9.4″ _module_preset=”default”]

Test Lighting and Sight Lines

[/et_pb_text][et_pb_text _builder_version=”4.9.4″ _module_preset=”default”]

Before committing to a palette, consider two more elements: lighting and sight lines (how the hues look when you see them from other rooms).

Rather than choosing paint by looking only at small swatches, buy sample-sized cans of your colors and paint them on poster boards.

Place your poster-sized paint samples so they’re visible as you walk through the house. Then look down the hallway and from room to room to see how the colors play off each other. And notice how the light affects the colors, too.

In her project, Mascara wanted to maximize the home’s light, so she chose paint accordingly. “Many of the spaces in our project didn’t have the best natural light,” she says, “so we brightened the walls in those spaces and kept the dark accent colors to a minimum.”

You may need to relocate certain colors, or even choose another color from your inspiration palette, to find the right flow. But once you’ve done so, you’ll be all set to put your whole-house palette into play.

[/et_pb_text][et_pb_text _builder_version=”4.9.4″ _module_preset=”default”]
Author: Kelley Walters
[/et_pb_text][et_pb_text _builder_version=”4.9.4″ _module_preset=”default”]
Visit HouseLogic.com for more articles like this. Reprinted from HouseLogic.com with permission of the NATIONAL ASSOCIATION OF REALTORS®.
[/et_pb_text][/et_pb_column][/et_pb_row][/et_pb_section]
ArticleHeaders_JULY_Striking

11 Striking Ways to Add Color to Any Room

[et_pb_section fb_built=”1″ _builder_version=”4.9.4″ _module_preset=”default”][et_pb_row _builder_version=”4.9.4″ _module_preset=”default”][et_pb_column type=”4_4″ _builder_version=”4.9.4″ _module_preset=”default”][et_pb_text _builder_version=”4.9.4″ _module_preset=”default” custom_margin=”||22px|||” custom_padding=”0px|||||” hover_enabled=”0″ sticky_enabled=”0″][/et_pb_text][et_pb_divider color=”#8F8F8F” divider_weight=”5px” _builder_version=”4.9.4″ _module_preset=”default” min_height=”13.2px” custom_margin=”-3px||1px|||”][/et_pb_divider][et_pb_text _builder_version=”4.9.4″ _module_preset=”default” custom_margin=”5px|||||” custom_padding=”0px|||||”]

Paint a door super bright yellow, or the trim on a window for amazing results.

Buying a house — it’s such an adult thing to do. And putting work into it is another mature choice.

But when personalizing your home, the instinct to keep things adulty can also keep things pretty dull. Gray walls. White ceilings. Taupe for miles. Suddenly your house (read: your life) is booooring.

Time to dive into the pigment pool. Hot pink, wowza red, rich navy, and other colors with a capital C can be just as chic as neutrals, and they’re a lot more fun. Here are 11 ways to bring loud, proud hues into your home without making it look straight outta Dr. Seuss.

[/et_pb_text][et_pb_text _builder_version=”4.9.4″ _module_preset=”default”]

#1 Paint the Inside of Your Cabinets

[/et_pb_text][et_pb_text _builder_version=”4.9.4″ _module_preset=”default”]

Because anyone can paint the doors, but getting rid of them and painting the inside is more interesting.

Using the same color on the cabinet’s back panel and the wall behind them adds continuity to the space.

Here, lemon yellow walls work complementary-color magic with the blue-gray cabinets. This is an easy way to get on-trend open shelving without replacing your cabinets.

[/et_pb_text][et_pb_text _builder_version=”4.9.4″ _module_preset=”default”]

#2 Paint Your Office Your Favorite Color

[/et_pb_text][et_pb_text _builder_version=”4.9.4″ _module_preset=”default”]

Because in there, you’re the boss.

The trick to making a bold palette work? Favorite color + white + contrasting color = smashing room.

These bold green walls get a chill pill from the white trim, area rug, and desk. That red bookcase and chair bring the big bang of contrasting color that shakes things up.

[/et_pb_text][et_pb_text _builder_version=”4.9.4″ _module_preset=”default”]

#3 Dare To Have A Bright Ceiling

[/et_pb_text][et_pb_text _builder_version=”4.9.4″ _module_preset=”default”]

Because you get a pop of color by painting just one surface.

This ceiling sizzle works because the hot pink repeats the color in the ikat wallpaper, and because the floors and furniture are in sober, neutral hues. The gold heart ties into those neutral colors as well as the wallpaper. Win-win.

[/et_pb_text][et_pb_text _builder_version=”4.9.4″ _module_preset=”default”]

#4 Choose Retro Hues

[/et_pb_text][et_pb_text _builder_version=”4.9.4″ _module_preset=”default”]

Because throwback colors turn cookie cutter into quirky cool.

Painting these ho-hum kitchen cabinets jadeite green gave them a shot of mid-century mod personality, and replacing the old pulls with retro brass ones punched up the 20th-century vibe.

You can’t beat a kitchen makeover for the cost of a gallon of paint and new cabinet hardware.

[/et_pb_text][et_pb_text _builder_version=”4.9.4″ _module_preset=”default”]

#5 Add Wow With Wallpaper

[/et_pb_text][et_pb_text _builder_version=”4.9.4″ _module_preset=”default”]

Because wallpaper’s back, and it’s not your grandma’s tea-rose print circa 1948.

Today’s wallpaper features bold prints and colors (and can even be temporary). This room looks sophisticated, not garish, because while one wall is rocking the psychedelic colors, the rest of the room is a mature blend of good old gray hues.

[/et_pb_text][et_pb_text _builder_version=”4.9.4″ _module_preset=”default”]

#6 Focus on the Floor

[/et_pb_text][et_pb_text _builder_version=”4.9.4″ _module_preset=”default”]

Because a bright color underfoot can add big personality to a neutral room.

Porch paint transformed a boring laminate kitchen floor into a whimsical turquoise-and-white checkerboard pattern. Bonus points for the gold cabinet pulls that pop against the blue floor.

[/et_pb_text][et_pb_text _builder_version=”4.9.4″ _module_preset=”default” locked=”off”]

#7 Paint the Window Trim


[/et_pb_text][et_pb_text _builder_version=”4.9.4″ _module_preset=”default” custom_margin=”-32px|||||”]

Because you don’t have time to repaint the entire kitchen.

Add pizzazz in an afternoon by painting a window pane’s trim a bright color. Just that.

You’ll get an instant focal point to distract from the clutter that never seems to totally leave the kitchen. For maximum impact, choose a color complementary to the cabinets.

[/et_pb_text][et_pb_text _builder_version=”4.9.4″ _module_preset=”default” locked=”off”]

#8 Don’t Re-Tile A Backsplash, Stick Decals On It

[/et_pb_text][et_pb_text _builder_version=”4.9.4″ _module_preset=”default”]

Because putting fancy tiles like these on a wall is expensive and a big commitment.

And unnecessary. Nope, those aren’t new tiles. They’re decals to put over your old tiles. Peel, stick, done. And if you hate them or just get tired of them? Pull off, throw away, done.

[/et_pb_text][et_pb_text _builder_version=”4.9.4″ _module_preset=”default” locked=”off”]

#9 Choose a Bold Hearth Hue

[/et_pb_text][et_pb_text _builder_version=”4.9.4″ _module_preset=”default”]

Because you can get a big bang of bold color by painting just one key thing.

Give your room an instant focal point by painting the fireplace, bricks, wood, and wall above it a single, brilliant color. Keep the rest of the room furnished simply and neutral, so the fireplace can be the star of the show.

[/et_pb_text][et_pb_text _builder_version=”4.9.4″ _module_preset=”default” locked=”off”]

#10 Paint the Backside Of A Door

[/et_pb_text][et_pb_text _builder_version=”4.9.4″ _module_preset=”default” custom_margin=”-21px|||||”]

Because it’s a great place to tuck in unexpected color.

This is especially effective in spaces that are otherwise neutral, like a bathroom. Because a door is a small surface, you can go bold without overpowering the room.

[/et_pb_text][et_pb_text _builder_version=”4.9.4″ _module_preset=”default” locked=”off”]

#11 Turn A Bedroom Ceiling Into Art

[/et_pb_text][et_pb_text _builder_version=”4.9.4″ _module_preset=”default”]

Because you spend a lot of time looking at it, so it should be interesting.

Painting this ceiling like the night sky takes the “Star Wars” theme to every surface. Bonus points for the light fixture that adds a bold pop of complementary yellow, and looks like BB-8.

[/et_pb_text][et_pb_text _builder_version=”4.9.4″ _module_preset=”default” hover_enabled=”0″ sticky_enabled=”0″]
Author: Leanne Potts
[/et_pb_text][et_pb_text _builder_version=”4.9.4″ _module_preset=”default”]
Visit HouseLogic.com for more articles like this. Reprinted from HouseLogic.com with permission of the NATIONAL ASSOCIATION OF REALTORS®.
[/et_pb_text][/et_pb_column][/et_pb_row][/et_pb_section]
ArticleHeaders_JULY_NoRegret

How to Not Regret the Paint Color You Choose

[et_pb_section fb_built=”1″ _builder_version=”4.9.4″ _module_preset=”default”][et_pb_row _builder_version=”4.9.4″ _module_preset=”default”][et_pb_column type=”4_4″ _builder_version=”4.9.4″ _module_preset=”default”][et_pb_text _builder_version=”4.9.4″ _module_preset=”default” custom_margin=”||30px|||” hover_enabled=”0″ sticky_enabled=”0″][/et_pb_text][et_pb_divider color=”#8F8F8F” divider_weight=”5px” _builder_version=”4.9.4″ _module_preset=”default” custom_margin=”-19px|||||”][/et_pb_divider][et_pb_text _builder_version=”4.9.4″ _module_preset=”default” custom_margin=”-22px|||||”]

The secret? It’s all about the lighting. Here’s how to get it right.

Well that was a total waste. That Robin’s Egg Blue you picked for your entryway now looks like the color of that (really cheap) beach hotel room back in your spring break days.

Kind of makes you feel sick.

Not at all what you envisioned.

“People have to understand that the color of an object won’t look the same 24 hours a day,” says lighting designer Joseph Rey-Barreau. “I just had bamboo flooring installed throughout my house, and during the day it looks totally different than it looks at night.”

The way we “see” color primarily depends on two things:

1. The light that an object absorbs. Black absorbs all colors; white absorbs none; blue absorbs red.

2. How the light source works. Natural light (sunlight) changes throughout the day and is affected by a room’s location. Artificial light changes with the type of bulb you use.

Here’s how to figure out how lighting will affect your paint color choices before you plunk down cash for the paint:

[/et_pb_text][et_pb_text _builder_version=”4.9.4″ _module_preset=”default”]

How Sunlight Affects Colors

[/et_pb_text][et_pb_text _builder_version=”4.9.4″ _module_preset=”default”]

As the amount and angle of the sun changes, so will your room colors.

“Natural light should always be considered when choosing color for a space,” says Sarah Cole of the Farrow & Ball paint company.

North-facing rooms: Light in these rooms is cool and bluish. Bolder colors show up better than muted colors; lighter colors will look subdued. “Use strong colors and embrace what nature has given,” says Cole.

South-facing rooms: Lots of high-in-the-sky light brings out the best in cool and warm colors. Dark colors will look brighter; lighter colors will virtually glow.

East-facing rooms: East light is warm and yellowy before noon, then turns bluer later in the day. These are great rooms for reds, oranges and yellows.

West-facing rooms: Evening light in these rooms is beautiful and warm, while scant morning light can produce shadows and make colors look dull.

[/et_pb_text][et_pb_text _builder_version=”4.9.4″ _module_preset=”default”]

How Light Bulbs Affect Color

[/et_pb_text][et_pb_text _builder_version=”4.9.4″ _module_preset=”default”]

The type of bulb you use can alter the colors in a room, too.

Incandescents: The warm, yellow-amber light of these bulbs will make reds, oranges, and yellows more vivid, while muting blues and greens.

Fluorescents: This flat and cool light enriches blues and greens.

Halogens: These white lights resemble natural light and make all colors look more vivid. Using halogens would make the shift from daylight to artificial light less jarring.

Compact fluorescent lights (CFLs): CFLs can produce either a warm white, neutral, or bluish-white light.

Light-emitting diodes (LEDs): You can buy warmer or cooler LEDs, and even “smart” LED bulbs whose color you can control wirelessly. “You can point to the color of the sky in a picture at sunset and make the light bulb in the house be that same color,” says Rey-Barreau.

Related: The Latest In Lighting Trends to Enhance Your Home

[/et_pb_text][et_pb_text _builder_version=”4.9.4″ _module_preset=”default”]

Tips for Achieving the Color You Want

[/et_pb_text][et_pb_text _builder_version=”4.9.4″ _module_preset=”default”]

1. Paint squares of primed drywall with samples of the colors you’re considering, and then move them around the room during the day. Apply at least two coats.

2. Evaluate samples of carpet during different daylight conditions.

3. Most contractors won’t hang lights before you paint, but you can get a color approximation by placing a bulb you’ll be using in a floor or desk lamp. If you’re hyper-sensitive to color or want a very specific look, ask your electrician to hang the lights, then cover them carefully during painting.

4. Remember that natural and artificial light will work together during certain times of day, especially in summer when dusk lasts a long time. Turn on artificial lights even during daylight to see what your colors will look like.

5. Paint sheen also affects color. Glossy finishes will reflect light and change the way the color looks, whereas flat finishes are less reflective and allow colors to look truer under bright light.

6. Light-colored walls can reflect the colors of bold carpets: A bright blue rug, for instance, can cast a bluish tone on a white wall.

[/et_pb_text][et_pb_text _builder_version=”4.9.4″ _module_preset=”default” hover_enabled=”0″ sticky_enabled=”0″]
Author: Lisa Kaplan Gordon
[/et_pb_text][et_pb_text _builder_version=”4.9.4″ _module_preset=”default”]
Visit HouseLogic.com for more articles like this. Reprinted from HouseLogic.com with permission of the NATIONAL ASSOCIATION OF REALTORS®.
[/et_pb_text][/et_pb_column][/et_pb_row][/et_pb_section]
TradeUpGFX_RAW

The Trade-Up Dilemma

[et_pb_section fb_built=”1″ _builder_version=”4.9.4″ _module_preset=”default”][et_pb_row _builder_version=”4.9.4″ _module_preset=”default”][et_pb_column type=”4_4″ _builder_version=”4.9.4″ _module_preset=”default”][et_pb_text _builder_version=”4.9.4″ _module_preset=”default”]

When it’s a seller’s market, trading up can be tough: Selling for a 10% premium when selling your $500,000 home is wonderful – $50,000 – but paying a 10% premium on the $1 million larger property – $100,000 – can take a bite. Many simply cannot afford it. Worse, many simply THINK they cannot afford it. Often math is the best way to evaluate these concerns. This is where a professional agent’s ADVISORY role has to kick in.

* Let’s assume this $500,000 property seller trading up to $1,000,000 is doing so now in a 3% interest rate environment.

* That extra cost is marginal (about $200 per month) when financed at 3%.

* It shifts of course when interest rates are higher. (At 4% that extra $100,000 costs almost $400 more per month!)

* Many ASSUME that prices will drop once interest rates rise. That is a possibility for sure. Yet in this ultra-tight inventory environment chances of that happening are reduced notably. Rising building material, land, regulatory, and labor costs won’t bring pricing down.

* Worse, as interest rates rise and more people turn to renting – or are compelled to rent – the more attractive returns become for investors as this usually fuels rent prices, especially in a higher inflation environment. The volume of investors buying single-family homes and apartments has multiplied large institutions and new funds are focused on this too The number of ‘competitors’ buying right now has been compounded by this growing segment COMBINED with the coming-of-age Millennial buyers.

While up-sizing right now may be a bit scary, buyers should also think about inflation. Their incomes may rise over time with inflation to catch up with the additional financing cost. Those considering renting to ‘wait this frenzy out’ may start to see notable price increases in rents especially over time. A $4,000 per month rent today escalating at just 3% annually compounded is over $5,300/month 10 years from now. At 2% its almost $4,900 and at 1% its over $4,400…

The fear of the future unknown is often made more palatable – and actionable – by calm, methodical evaluation. Don’t hesitate to contact the Dinsmore Group, we’re here to provide guidance and insight.

[/et_pb_text][et_pb_image src=”https://carolinedinsmoreandco.com/wp-content/uploads/2021/03/11.jpg” title_text=”11″ _builder_version=”4.9.4″ _module_preset=”default”][/et_pb_image][/et_pb_column][/et_pb_row][/et_pb_section]
Spaces

5 Things Perfect Outdoor Entertaining Spaces Do (and Yours Can, Too)

[et_pb_section fb_built=”1″ _builder_version=”4.9.4″ _module_preset=”default”][et_pb_row _builder_version=”4.9.4″ _module_preset=”default”][et_pb_column type=”4_4″ _builder_version=”4.9.4″ _module_preset=”default”][et_pb_text _builder_version=”4.9.4″ _module_preset=”default” hover_enabled=”0″ sticky_enabled=”0″][/et_pb_text][et_pb_divider divider_weight=”19px” _builder_version=”4.9.4″ _module_preset=”default” background_color=”#969696″ custom_margin=”-31px|||||”][/et_pb_divider][et_pb_text _builder_version=”4.9.4″ _module_preset=”default” hover_enabled=”0″ sticky_enabled=”0″]

These 5 timeless ideas work because they’re both fun and functional.

Outdoor entertaining spaces aren’t always equal when it comes to home value (think about that house with the falling-down above-ground pool with no curb appeal at all). Homes that get them right, though, have patios and backyards that blur inside and outside spaces.

And the best thing: these outdoor entertaining space ideas have been working for decades — and adapt to most any house today. Here are five reasons why they work (and why you may want to add to your home):

[/et_pb_text][et_pb_text _builder_version=”4.9.4″ _module_preset=”default”]

#1 They Function Like Indoor Spaces

[/et_pb_text][et_pb_text _builder_version=”4.9.4″ _module_preset=”default” custom_margin=”||-4px|||” custom_padding=”||0px|||”]

The more outdoor entertaining spaces mimic their indoor equivalents, the more functional they are. And you’ll get more than sunshine and memories: According to the “Remodeling Impact Report” from the National Association of REALTORS®, you’ll recoup 70% of your costs on resale after building a new patio. An outdoor kitchen gets 71%.

A couple of small ways to get more functionality in your outdoor space:

    • Add built-in benches for seating.
    • Hang a chandelier or pendant lights for functional lighting over a dining space.
[/et_pb_text][et_pb_text _builder_version=”4.9.4″ _module_preset=”default” custom_margin=”2px|||||”]

#2 They Create Privacy Without Blocking Light

[/et_pb_text][et_pb_text _builder_version=”4.9.4″ _module_preset=”default”]

Precast-concrete geometric blocks protect privacy without blocking light or air in outdoor entertaining spaces. Plus, they’re super affordable and durable.

Use them to screen a patio or carport, fence in your patio, or as a vertical element to make small yards feel larger. It’s a small project with big impact.

[/et_pb_text][et_pb_text _builder_version=”4.9.4″ _module_preset=”default”]

#3 They Find Clever Ways to Provide Shade

[/et_pb_text][et_pb_text _builder_version=”4.9.4″ _module_preset=”default” min_height=”146px” custom_margin=”||3px|||” custom_padding=”||0px|||”]

Low, sloping roofs help transition from indoors to outdoors by casting shade and protection from the elements.

If extending the roof isn’t an option for your home or budget (fair), you can still make some shade. For example:

    • Try a pergola planted with vines.
    • Or a retractable awning, which keeps the sun off when you want it to, and rolls back into place when you don’t.
    • Tons of affordable, ready-to-hang shades and sails are available, too.
[/et_pb_text][et_pb_text _builder_version=”4.9.4″ _module_preset=”default” min_height=”22px” custom_margin=”4px|||||” custom_padding=”2px|||||”]

#4 They Use Lots of Windows — and Big Ones

[/et_pb_text][et_pb_text _builder_version=”4.9.4″ _module_preset=”default” min_height=”134px” custom_margin=”||2px|||”]

Large windows help merge inside and outside living. Even if you don’t have the ultimate in window bling like this atrium, you can increase the natural light in your home. Consider:

    • Trading smaller windows and doors for big accordion, pocket, sliding or swinging doors, or replacing a plain wall with a wall of glass doors.
    • Adding a corner window, to create the effect of an atrium or courtyard.
[/et_pb_text][et_pb_text _builder_version=”4.9.4″ _module_preset=”default”]

#5 They Take ‘Entertaining Outdoors’ Seriously

[/et_pb_text][et_pb_text _builder_version=”4.9.4″ _module_preset=”default”]

Though a sport court isn’t exactly a high ROI project, being the fun house on the block certainly does a little something to a home’s appeal.

And, after all, an outdoor entertaining space should do just that: entertain. Here’s to a fun summer season!

[/et_pb_text][et_pb_text _builder_version=”4.9.4″ _module_preset=”default” hover_enabled=”0″ sticky_enabled=”0″]
Author: Kelley Walters
[/et_pb_text][et_pb_text _builder_version=”4.9.4″ _module_preset=”default”]
Visit HouseLogic.com for more articles like this. Reprinted from HouseLogic.com with permission of the NATIONAL ASSOCIATION OF REALTORS®.
[/et_pb_text][/et_pb_column][/et_pb_row][/et_pb_section]
Kitchens

Mouth-Watering Outdoor Kitchens (And Surprise! Their ROI Is Great)

[et_pb_section fb_built=”1″ _builder_version=”4.9.4″ _module_preset=”default”][et_pb_row _builder_version=”4.9.4″ _module_preset=”default”][et_pb_column type=”4_4″ _builder_version=”4.9.4″ _module_preset=”default”][et_pb_text _builder_version=”4.9.4″ _module_preset=”default” hover_enabled=”0″ sticky_enabled=”0″][/et_pb_text][et_pb_divider divider_weight=”19px” _builder_version=”4.9.4″ _module_preset=”default” background_color=”#969696″ min_height=”13px” custom_margin=”-29px|||||” custom_padding=”||0px|||” hover_enabled=”0″ sticky_enabled=”0″][/et_pb_divider][et_pb_text _builder_version=”4.9.4″ _module_preset=”default” hover_enabled=”0″ sticky_enabled=”0″]

What they typically cost, and tips for getting the most return on your investment.

Building an outdoor kitchen is more than an indulgence: These backyard beauties can improve your home’s value. Outdoor kitchens typically get a 71% return on investment, according to the “Remodeling Impact Report” from the National Association of REALTORS® — and that’s on top of your own outdoor-cooking joy.

The investment can be a little — or a lot. These five outdoor kitchen ideas fit a range of budgets and homes.

[/et_pb_text][et_pb_text _builder_version=”4.9.4″ _module_preset=”default”]

#1 A Tiny Outdoor Kitchen for Limited Spaces

[/et_pb_text][et_pb_text _builder_version=”4.9.4″ _module_preset=”default”]

If you boil down an outdoor kitchen to the basics, what more do you need than a grill, a little oven, cupboard space, and a cozy place to sit? This setup does it all efficiently, for as little as a few hundred dollars if you already have outdoor electricity. An electrician will add to the cost.

[/et_pb_text][et_pb_text _builder_version=”4.9.4″ _module_preset=”default”]

#2 An Outdoor Kitchen From a Kit

[/et_pb_text][et_pb_text _builder_version=”4.9.4″ _module_preset=”default”]

Modular kits, like this one from WWOO (starting around $1,500), can be customized to suit your backyard. Some companies even offer design help for additional cost.

The galley-inspired layout here also does double duty by adding privacy. (Keep in mind the cool outdoor sink requires additional plumbing, which will increase the cost.)

[/et_pb_text][et_pb_text _builder_version=”4.9.4″ _module_preset=”default”]

#3 An Outdoor Kitchen Made of Concrete & Steel

[/et_pb_text][et_pb_text _builder_version=”4.9.4″ _module_preset=”default”]

DIY-savvy homeowners used concrete and cement board to create this L-shaped outdoor kitchen that mimics today’s indoor layouts. Guests relax at the counter while the host flips burgers — it’s open-concept living in the great wide-open.

No, this isn’t DIY 101, but if you’ve got the skill set you can do it for the cost of materials — and concrete is cheap. If you hire a pro, though, the typical cost is about $14,000 for a kitchen that includes an inset grill, steel drawers, ice chest, sink, and concrete countertop, according to the “Remodeling Impact Report.”

[/et_pb_text][et_pb_text _builder_version=”4.9.4″ _module_preset=”default”]

#4 An Outdoor Kitchen With Personal Style

[/et_pb_text][et_pb_text _builder_version=”4.9.4″ _module_preset=”default”]

Your outdoor kitchen doesn’t have to look like everyone else’s. But it should match your home’s style if you want to get a return on your investment. This DIY kitchen fits the home’s rustic style and comes with enough storage any indoor cook would envy.

[/et_pb_text][et_pb_text _builder_version=”4.9.4″ _module_preset=”default”]

#5 An Outdoor Kitchen That Says “Sit a Spell”

[/et_pb_text][et_pb_text _builder_version=”4.9.4″ _module_preset=”default”]

Your outdoor kitchen can play the same role in your yard that your kitchen inside does: as the heartbeat of every gathering where guests will want to stay awhile. And bonus: The added deck and pergola could also kick up your home value a couple of notches.

[/et_pb_text][et_pb_text _builder_version=”4.9.4″ _module_preset=”default” hover_enabled=”0″ sticky_enabled=”0″ custom_margin=”||19px|||”]
Author: Jamie Wiebe
[/et_pb_text][et_pb_text _builder_version=”4.9.4″ _module_preset=”default”]
Visit HouseLogic.com for more articles like this. Reprinted from HouseLogic.com with permission of the NATIONAL ASSOCIATION OF REALTORS®.
[/et_pb_text][/et_pb_column][/et_pb_row][/et_pb_section]
deck

5 Deck Makeover Projects That Cost Less Than a Fancy Dinner Out

[et_pb_section fb_built=”1″ _builder_version=”4.9.4″ _module_preset=”default”][et_pb_row _builder_version=”4.9.4″ _module_preset=”default”][et_pb_column type=”4_4″ _builder_version=”4.9.4″ _module_preset=”default”][et_pb_text _builder_version=”4.9.4″ _module_preset=”default” hover_enabled=”0″ sticky_enabled=”0″][/et_pb_text][et_pb_divider divider_weight=”19px” _builder_version=”4.9.4″ _module_preset=”default” background_color=”#969696″ min_height=”13px” custom_margin=”-28px|||||”][/et_pb_divider][et_pb_text _builder_version=”4.9.4″ _module_preset=”default” hover_enabled=”0″ sticky_enabled=”0″]

Want to upgrade your deck but watching your budget? Here are 5 easy deck makeover ideas, many well under $300.

If you’d rather hide inside rather than hang out on your tired-looking deck, you need a deck makeover.

Here are five ways to transform your deck back to its fun self.

[/et_pb_text][et_pb_text _builder_version=”4.9.4″ _module_preset=”default”]

#1 Install a Stone Landing at the Foot of Your Deck Stairs

[/et_pb_text][et_pb_text _builder_version=”4.9.4″ _module_preset=”default”]

Dress up the transition from your deck to your yard with a little hardscaping — a stone landing at the bottom of your deck stairs. Stones are a natural compliment to wood decks, and they’ll help prevent mud from forming where there’s heavy foot traffic.

Cost: Flagstone is priced by the pound; you’ll spend $60-$100 for enough stone for a 3-foot-by-4-foot landing.

How-to: Techniques for installing a landing are the same as putting in a patio , although you’ll have to temporarily support your existing stairway while you work around — and under — it.

What else: You should be able to add a landing in less than a day. It’ll get done faster if you hire a pro, but it’ll cost you another $150-$200 in labor.

[/et_pb_text][et_pb_text _builder_version=”4.9.4″ _module_preset=”default”]

#2 Put Up a Privacy Screen

[/et_pb_text][et_pb_text _builder_version=”4.9.4″ _module_preset=”default”]

Whether you’re relaxing alone au naturel or entertaining friends, a little home privacy is always welcome. You can add some vertical supports and fill in a variety of cool screening materials that are as nice for your neighbors to look at as they are for you.

Types and costs:

    • Bamboo fencing comes in a 6-foot-by-16-foot roll for $20-$25.
    • Lattice panels are either wood or plastic, $15-$30 for a 4-foot-by-8-foot panel.
    • Grow climbing plants on a trellis ($20-$100) to create a living privacy screen. Plant climbing vines in tall containers ($40-$120) to raise them above the deck surface and give them a head start filling in your screen.
    • Outdoor fabric resists moisture and fading; $12-$120 per yard. You’ll pay another $20 to have a seamstress cut and hem a 3-foot-by-5-foot panel.

How-to: Your privacy screen should integrate with your deck; make the framework using the same basic materials as your deck railing and structure.

Add some flash by building a frame with 2-by-2- or 2-by-4-inch uprights spaced 1 foot apart, then weaving aluminum flashing between the uprights.

What else: Make sure to position your privacy screen where you’ll get maximum benefit. Sit on your deck and check your lines of sight.

[/et_pb_text][et_pb_text _builder_version=”4.9.4″ _module_preset=”default”]

#3 Add Solar Lighting

[/et_pb_text][et_pb_text _builder_version=”4.9.4″ _module_preset=”default”]

Add lighting to your deck if you’re wanting your deck to come alive after dark. Try solar lights: you don’t need an on/off switch — they light up when it gets dark, then fade away 4-6 hours later.

You won’t have to plug them in or wire anything, either. Their solar-charged batteries are renewed every day, and the lights are built to withstand all kinds of weather.

Types and cost:

    • Paper lanterns (made from synthetic, weatherproof nylon; $20-$30) are made for hanging and come in all sorts of fun shapes, sizes, and colors.
    • Carriage lights can be fixed on top of a pillar or railing newel post. $45-$150.
    • Solar illuminated replicas of old-fashioned mason jars can be set on any flat surface, about $35.
    • Rope lights have small LED bulbs inside a flexible cord. A 25-foot-long rope with solar charger and stand is $25.

What else: Suspend lanterns from overhead trellises, railings, and nearby trees, where they’ll shed a soft, colorful glow. Wind rope lights around rafters and railings.

[/et_pb_text][et_pb_text _builder_version=”4.9.4″ _module_preset=”default”]

#4 Paint a Faux Floor Rug on Your Decking 

[/et_pb_text][et_pb_text _builder_version=”4.9.4″ _module_preset=”default”]

Punch up a boring old deck with a faux rug. This is a fairly low-cost project with a big wow factor, and one you can share making with your (well-behaved) kids. It works best on a newly cleaned deck (see below).

Cost: Most of your cost will be deck stain or paint in various colors. Because you won’t be using that much stain per color, you can buy quarts. Figure $15-$20 per quart.

How-to: Figure out a size, sketch out the design on your decking, and then all you have to do is paint or stain between the lines. You can use painter’s tape as a guide, but a little leakage is likely on a wood decking surface.

What else: Keep a few basic cleaning supplies on hand for any drips or spills. After the stain is dry, coat the entire deck with a clear deck sealer.

[/et_pb_text][et_pb_text _builder_version=”4.9.4″ _module_preset=”default”]

#5 Wash and Refinish Your Wood Decking

[/et_pb_text][et_pb_text _builder_version=”4.9.4″ _module_preset=”default”]

The ultimate deck makeover is none other than a good cleaning. Applying a coat of deck sealant afterward ensures your wood decking looks great and will last for decades.

Cost: There are many brands of deck cleaning and brightening solutions. Some require the deck to be wet; others need the decking to be dry. Some are harmful to plants and you’ll have to use plastic sheeting to protect your landscaping. Consult the instructions carefully. 

You’ll pay $15-$25 per gallon, enough to clean 300 sq. ft. of decking.

How-to: Scrubbing with a good cleaning solution and rinsing with a garden hose is more foolproof than scouring your decking with a power washer that may damage the surface of the wood. 

What else: After you deck is cleaned, apply a coat of deck stain or clear finish. The sealer wards off dirt, wear, and UV rays, and helps prevent deck splinters. A gallon covers 250-350 sq. ft., $20-$35/gallon

[/et_pb_text][et_pb_text _builder_version=”4.9.4″ _module_preset=”default” hover_enabled=”0″ sticky_enabled=”0″ custom_margin=”||14px|||”]
Author: John Riha
[/et_pb_text][et_pb_text _builder_version=”4.9.4″ _module_preset=”default”]
Visit HouseLogic.com for more articles like this. Reprinted from HouseLogic.com with permission of the NATIONAL ASSOCIATION OF REALTORS®.
[/et_pb_text][/et_pb_column][/et_pb_row][/et_pb_section]